Arduino Leonardo Pinout and Specification

Arduino Leonardo Pinout
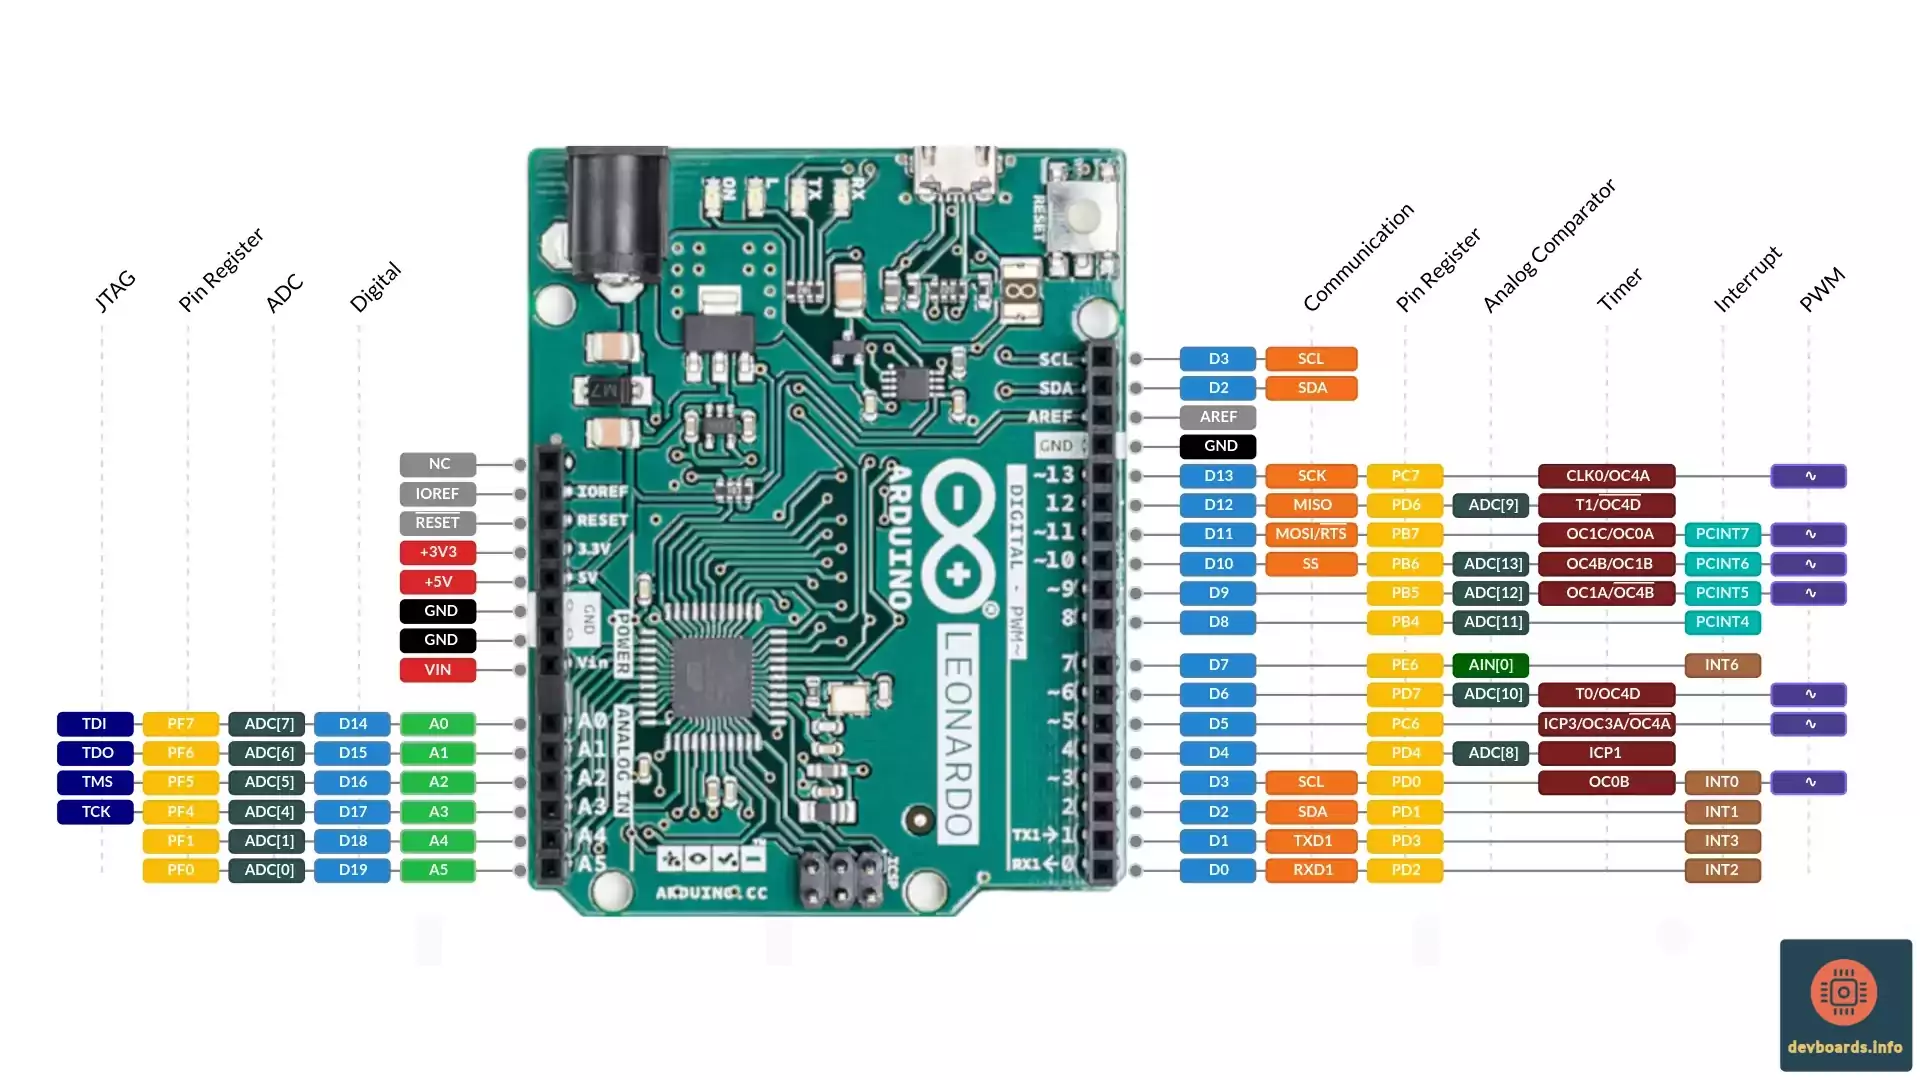
Arduino Leonardo Pinout includes 20 digital I/O pins, 12 analog input and 7 PWMs.

The board utilizes ATmega32U4 microcontroller with 16 Mhz crystal oscillator, 32 Kbytes Flash, 2.5 Kbytes SRAM and 1 Kbytes EEPROM. It also provides a TWI (I2C), SPI, UART and a 10-bit ADC.

Arduino Leonardo has the same form factor as Arduino Uno Rev3 but it has a built-in USB communication. This eliminates the need for a secondary processor for communication. It also allows the Arduino Leonardo to appear to a connected computer as a mouse or keyboard.

Platform

ManufacturerArduino
ProcessorATmega32U4
Processor FamilyAVR
Clock Speed16 MHz
Flash Memory32 KB
SRAM2.5 KB
EEPROM1 KB

I/O

Digital I/O20
Analog Input12
PWM7
ADC Resolution1024
Interrupts5

Power

Input Voltage7-12 V
I/O Voltage5 V
I/O Current10 mA

Communication Protocols

I2C1x
SPI1x
UART1x

Connectivity

USB Micro B1x

Peripherals

Watchdog Timer1

Dimensions

Width53.3 mm
Length68.6 mm
Weight20 g

Arduino Leonardo Pin Headers and Components  

The Arduino Leonardo is known for its unique integration of the ATmega32U4 microcontroller, which includes USB functionality. This allows it to communicate directly with a computer as a keyboard, mouse, or other USB devices. Let's examine the physical components and pin headers on the board to better understand its layout and functionality.

Dimensions

The board measures 68.6mm x 53.3mm

Arduino Leonardo Dimensions53.5 mm68.6 mm

Digital I/O Pins

The Arduino Leonardo has 14 digital I/O pins and 7 of them support PWM (Pulse Width Modulation).

Arduino Leonardo Digital I/O Pins

Analog Input Pins

The board provides twelve analog input pins. These pins can read analog signals within a range of 0-5V, converted by the ATmega32U4’s 10-bit ADC (Analog-to-Digital Converter). The analog pins are essential for working with analog sensors like temperature sensors, potentiometers, or other variable input devices.

Arduino Leonardo Analog Input Pins

Power Socket

A 2.1mm center-positive power socket is one of the options to power the board. You can connect the battery pack or an AC-to-DC adapter (wall-wart) to this socket.

Arduino Leonardo Power Socket

Micro-USB Port

The micro-USB port is one of the key features of the Arduino Leonardo and is used for both programming and USB communication. By integrating USB functionality directly into the ATmega32u4 microcontroller, the Arduino Leonardo can act as a USB HID (Human Interface Device), allowing it to emulate keyboards, mice, and other USB peripherals.

Arduino Leonardo Micro-USB Port

Reset Button

Located near the micro-USB port, the Reset button allows users to reset the board, stopping and restarting the program currently loaded. Pressing it resets the microcontroller without disconnecting the board, which is useful during the development and debugging process.

Arduino Leonardo Reset Button

ICSP Header

The In-Circuit Serial Programming (ICSP) header is located near the microcontroller and provides an alternative way to program the Leonardo using an external programmer. This header gives direct access to the ATmega32U4's SPI pins and is useful for advanced programming, bootloader updates, or low-level debugging.

Arduino Leonardo ICSP Header

LED Indicators

The board has multiple LEDs. One as a power indicator, a pair of RX and TX LEDs, near the micro-USB port, blink to indicate data reception (RX) and transmission (TX) activity during USB or serial communication, and an LED connected to D13 that is often used for testing and debugging purposes in simple programs or initial setups.

Arduino Leonardo LED Indicators

Powering Arduino Leonardo  

The Arduino Leonardo provides several options for power, allowing flexibility in different project setups. Here are the main ways to power the board:

USB Power via Micro-USB Port

This is the primary option for power and programming. The micro-USB port serves as the most convenient power source for the Arduino Leonardo, supplying the board with 5V from a computer or USB power adapter. When powered via USB, the onboard voltage regulator maintains a stable 5V supply for the board's components.

Arduino Leonardo Micro-USB Port

VIN Pin (External Power Supply)

The VIN pin allows you to connect an external power source within the 7-12V range. This power option passes through the onboard voltage regulator, which steps down and stabilizes the voltage to 5V, protecting the components on the board. Common battery options include 9V batteries, lithium batteries, or AA battery packs with appropriate voltage ranges are among possible choices to power the board via this VIN pin.

Arduino Leonardo VIN Pin

Powering Through the 5V Pin (Direct Power Supply)

For advanced users, the 5V pin can be used to supply regulated 5V directly to the board. This approach bypasses the voltage regulator, meaning the input must be carefully regulated to avoid damaging the board. This option is ideal when using an external regulated 5V source, like a dedicated 5V power supply or battery.

Important Caution: Supplying voltage through the 5V pin bypasses the onboard voltage protection, so only use this method if the power source is stable.

Arduino Leonardo Powering Through the 5V Pin

3.3V Output Pin

The Arduino Leonardo pinout includes a 3.3V output pin, ideal for powering low-voltage sensors or modules that require 3.3V rather than 5V. This pin has a limited output current, so it should only be used for low-power peripherals.

Arduino Leonardo 3.3V Output Pin


Arduino Leonardo Pinout and Peripherals  

The Arduino Leonardo is equipped with several built-in peripherals, all integrated within the ATmega32U4 microcontroller. These peripherals enable the board to handle a variety of functions, from digital communication to advanced signal processing. Here’s a breakdown of the main peripherals available on the Leonardo:

UART (Universal Asynchronous Receiver/Transmitter)

The Arduino Leonardo features one UART (Universal Asynchronous Receiver-Transmitter) for serial communication. Unlike most other Arduino boards, the Leonardo’s ATmega32U4 microcontroller allows it to maintain separate USB and UART communication, useful for projects that require simultaneous USB and serial connections.

I2C

The Leonardo includes an I2C interface for communication with various I2C-enabled devices, such as sensors, displays, and expanders. The I2C protocol uses pins A4 (SDA) and A5 (SCL) to send data between the microcontroller and peripherals.

SPI (Serial Peripheral Interface)

The SPI interface on Arduino Leonardo allows high-speed communication with SPI-enabled devices, often used for SD cards, displays, or other high-speed data transfer needs. The SPI peripheral is also exposed via ICSP headers on the board.

PWM (Pulse Width Modulation)

The Arduino Leonardo has 7 PWMs allowing the board to output analog-like signals by rapidly toggling the digital pins on and off. This is ideal for tasks like motor control, LED dimming, and audio signal generation.

Analog-to-digital converter (ADC)

The Leonardo has 12 analog input channels that convert analog signals into digital values. Each analog input reads signals with a 10-bit resolution, providing values from 0 to 1023. This is crucial for applications involving sensors, potentiometers, or any other variable signal sources.

USB HID (Human Interface Device)

Thanks to the ATmega32U4, the Arduino Leonardo can act as a USB HID device, such as a keyboard, mouse, or joystick, without requiring extra chips. This functionality makes the Leonardo popular for projects that interact with PCs, allowing the board to send keystrokes, mouse movements, and other HID signals to a connected computer.

Timers and Counters

The board includes three timers, Timer0, Timer1, and Timer3, that control functions such as PWM generation, interrupts, and timekeeping. These timers can be configured to trigger at specific intervals, making them useful for handling precise timing in tasks like delays, servo control, and other time-sensitive processes.

External and Internal Interrupts

The Arduino Leonardo pinout includes 5 external interrupts. These are essential for responding to asynchronous events like button presses. The board also supports internal interrupts, which can be triggered by timers, making it useful for real-time applications.


Programming Arduino Leonardo  

The Arduino Leonardo can be programmed using various environments and supports multiple programming languages, making it versatile for a wide range of applications. Here are the primary options available for programming the Leonardo:

  • Arduino IDE: The Arduino IDE is the primary environment for programming the Leonardo, widely known for its simplicity and support for Arduino-specific libraries and functions.
  • Arduino Web Editor: The Arduino Web Editor is the cloud version of the Arduino IDE, accessible through any web browser. The code can be shared, saved, and collaborated on within the cloud environment, allowing for teamwork and code version control.
  • PlatformIO: PlatformIO is an alternative IDE with advanced features, such as multi-platform support, automated testing, and advanced debugging tools. It can be integrated as an extension within Visual Studio Code, offering a robust, professional-grade development environment.
  • Arduino (CLI): For Advanced Users: The Arduino CLI (Command Line Interface) allows for programming the Leonardo directly from the command line, which is ideal for automation, scripting, or integrating with larger development pipelines. The CLI can be integrated into CI/CD pipelines, enabling automated testing, building, and deployment.
Arduino Leonardo FAQ
  • What is the maximum current output for each digital I/O pin?

Each digital pin can source or sink 40 mA.

  • Can I connect the Leonardo to my computer without a driver?

Yes, most modern OSes recognize the Leonardo without additional drivers.

  • What is the difference between Arduino Uno and Leonardo?

The key difference is that the Leonardo has native USB support, enabling HID functions.

  • Can I use Arduino Uno instead of Leonardo?

No. The microcontroller on the Arduino Leonardo (ATmega32U4) supports acting as a USB client device (HID). The Uno has an ATmega328 which does not support this.

  • Does Leonardo have built-in EEPROM?

Yes, it includes 1 KB of EEPROM.

  • How do I install the bootloader on the Arduino Leonardo?

You can use an ICSP programmer to reinstall the bootloader if necessary.

  • Is Arduino Leonardo better than Uno?

Yes. Leonardo has more analog pins and also has built-in support for the USB HID function that allows it to be used to emulate a mouse or keyboard when connected to a PC.

  • Can I power the board through the 5V pin?

Yes, but the 5V must be a regulated source, as it bypasses the voltage regulator.

  • Does the Arduino Leonardo support USB HID?

Yes, it can emulate USB HID devices like keyboards and mice.