Arduino Mega ADK Pinout & Specification

Arduino Mega ADK Rev3 Pinout

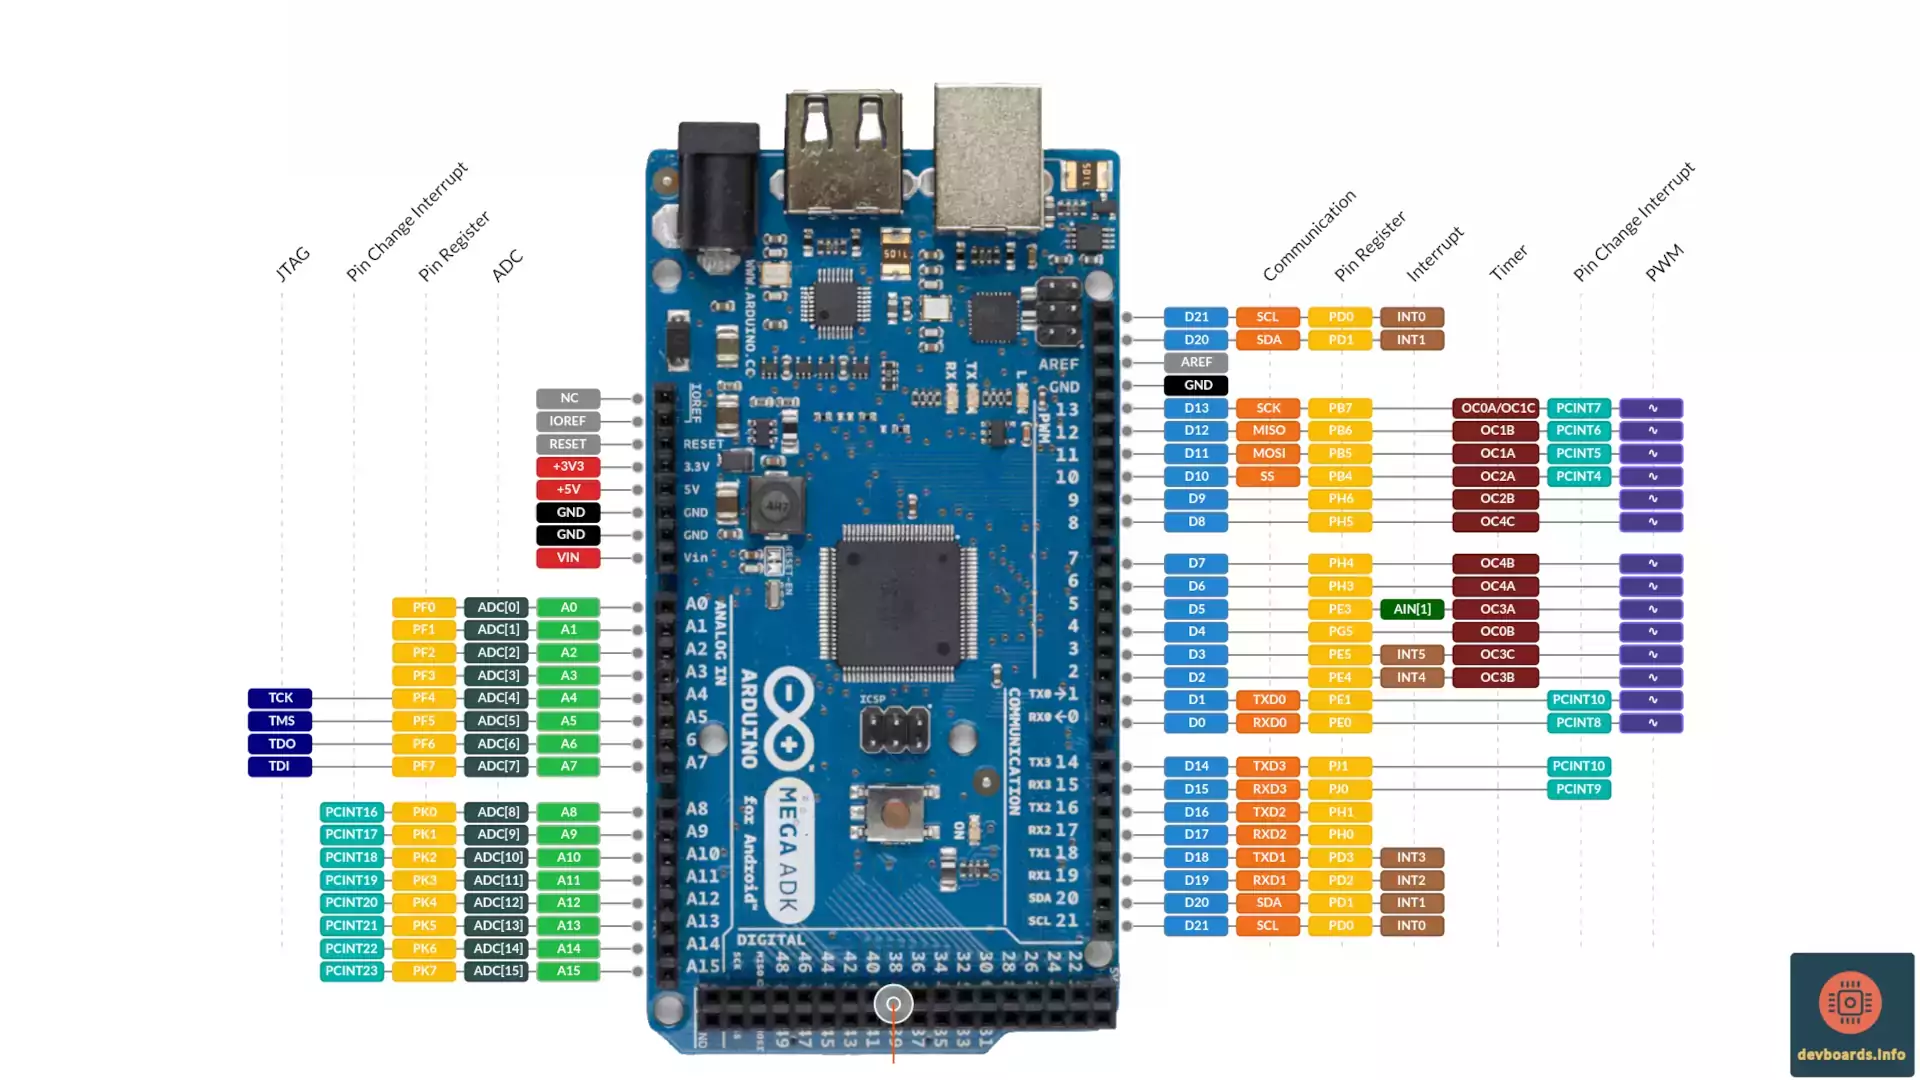
The Arduino Mega ADK is a development board based on the ATmega2560 microcontroller. It shares a lot of features with Arduino Mega 2560 Rev3 with an extra USB host feature.

Some of the key features of the Arduino Mega ADK include:

  • A large number of digital and analog I/O pins, including 54 digital I/O pins and 16 analog inputs and 15 PWM
  • A 16 MHz clock speed and 256 KB of flash memory
  • Support for USB Host, allowing connection of USB devices such as keyboard, mouse and other peripherals
  • A range of communication protocols, including UART, I2C, SPI
  • JTAG for testing
  • Power jack for an external power source
  • ICSP header for programming with an external programmer
  • Reset button

Arduino Mega ADK Rev3 Pin Headers and Components  

The Arduino Mega ADK is a relatively large development board that is packed with a variety of components and features. Here are a few of the most important components and connectors to be aware of:

  • Dimensions: The board measures 101.52mm x 53.3mm.
  • Digital I/O Pins: The board has 54 digital input/output pins, which can be used for a variety of purposes, such as reading sensors, controlling LEDs, and communicating with other devices. 15 of these pins can also be used as PWM outputs for controlling the brightness of LEDs or the speed of motors as an example.
  • Analog Input Pins: The board provides 16 analog input pins, which can be used for reading analog sensors, such as temperature sensors, light sensors, and potentiometers.
  • Power Pins: Arduino Mega ADK have several power pins, including 3.3V and 5V pins, which can be used to power other devices or sensors. The board also has a VIN pin, which is the input voltage to the board when it is powered by an external power supply.
  • Reset Button: The reset button can be used to restart the microcontroller or to put it into bootloader mode for uploading new sketches.
  • ICSP Header: The ICSP header is intended for programming the board with an external programmer.
  • USB Connector: The board has two USB port. One USB type B which can be used for programming the board and for providing power to the board. The other is USB type A connector that can be used to connect other USB devices to the board. In those scenarios the board acts as the USB host.
  • Power Jack: The board has a 2.1 mm center-positive power jack, which can be used for connecting an external power supply, such as a battery or wall adapter.
  • LEDs: The board utilizes several LEDs, including a power LED, a pin 13 LED, and a RX and TX LEDs which indicate when data is being transmitted or received.

Powering Arduino Mega ADK Rev3  

The Arduino Mega ADK's microcontroller (ATmega2560) can handle the maximum voltage of 5.5V DC. The board can be powered through the USB Type B connector or an external power supply. It has a voltage regulator on board that converts the input voltage to the appropriate voltage for the microcontroller.

The power supply options for the Arduino Mega ADK are:

  • USB type B: The board can be powered by connecting it to a computer via the USB type B connector. This is the most common method of powering the board during development.
  • External Power Supply: The board can also be powered by an external power supply connected to the DC jack. The voltage range for this method is 7-12V DC.
  • VIN Pin: The board can also be powered by an external power supply connected to the VIN pin. The voltage range for this method is 7-12V DC.
  • Power Pins: It's even possible to power the board by an external power supply connected to the 5V pin. The voltage range for this method is 4.5-5.5V DC.

It is really important to note that when using an external power supply, the voltage should not exceed the maximum voltage range of the board to avoid damaging the microcontroller. The power supply should also be able to provide enough current to power the board and any connected peripherals.


Arduino Mega ADK Rev3 Pinout and Peripherals  

The board is equipped with a variety of peripherals to support various types of projects. Here are some of the peripherals provided by the processor of the Arduino Mega ADK:

  • Analog-to-digital converter (ADC): It has 16 10-bit analog input pins that can be used to read analog signals, such as those from sensors.
  • Timers: The ATmega2560 contains several timers, including a 16-bit timer/counter with PWM and a 8-bit timer/counter with PWM. These timers can be used for a variety of purposes, such as controlling the speed of motors or generating PWM signals for controlling the brightness of LEDs to name a few.
  • Watchdog timer: The board has a watchdog timer that can be used to reset the board in case of a software failure.
  • Interrupts: The processor has 6 interrupt pins that can be used to trigger events in response to external inputs.
  • PWM: Among 54 I/O pins 15 of them have PWM capability which can be used to generate PWM signals for controlling the brightness of LEDs or the speed of motors.
  • Communication protocols: The board supports several communication protocols, including UART, I2C, and SPI, which can be used to communicate with other devices or sensors.

Programming Arduino Mega ADK Rev3  

Before talking about programming tools, let's first answer an important question:

What is ADK abbreviated for?

The Android Development Kit (ADK) is a set of software tools and components that enable developers to create applications for the Android operating system. It includes tools for designing, testing, and debugging Android apps, as well as libraries and APIs for accessing the hardware and software features of Android devices.

The Arduino Mega ADK can be used in combination with the Android Development Kit to create a range of applications and projects. For example, an Android app can communicate with the board over USB to control the digital and analog inputs, or to receive data from sensors connected to the board. The app can also access the other hardware and software features of the Android device, such as the camera, accelerometer, and GPS, and use this information to control the outputs of the board.

There are many options to program this board. Here is the list of most common tools and Integrated Development Environments (IDEs) that can be used.

  • Arduino IDE: The most popular and widely used IDE for programming the Arduino Mega ADK is the Arduino IDE. This is a free and open-source software that can be downloaded from the official Arduino website. The Arduino IDE supports a wide range of programming languages, including C and C++.
  • Atmel Studio: Another popular IDE for programming the ATmega2560 microcontroller is Atmel Studio. This is a proprietary software that is developed by Atmel, the company that manufactures the microcontroller. It provides advanced features like debugging, programming, and device programming.
  • AVRDUDE: AVRDUDE is a command-line tool that can be used to program the ATmega2560 microcontroller. It supports a wide range of programming methods, including JTAG, ISP, and PDI. It is especially useful for advanced users who are comfortable working with command-line interfaces.
  • AVR Studio: AVR Studio is a proprietary software that is developed by Atmel, the company that manufactures the microcontroller. It provides advanced features like debugging, programming, and device programming.
  • PlatformIO: PlatformIO allows developer to compile the same code with different development platforms using only one IDE. It is one of the most popular tools on top of Visual Studio Code. It supports a variety of boards in including Arduino Mega ADK
  • Arduino Web Editor: The Arduino Web Editor allows you to write code and upload it to Arduino boards from your web browser. It doesn't require user to install any software on his/her computer which makes it a good choice for beginners. Your code will be stored in your Arduino cloud account.

Documentation  

Unfortunately, as the board is already retired, the amount of resources online about the Arduino Mega ADK is considerably less than other similar boards. Of course the reference documentation is still available on Arduino website. But it's not like Arduino Uno Rev3 or Arduino Nano in which you could find tons of tutorials and YouTube videos online. Here are some links to reference documentation about this board that could definitely be useful when working on this board:

  1. Arduino Mega ADK Rev3 page on Arduino website: The only official page about this board on Arduino website
  2. ATmega2560 Microcontroller Datasheet: The ATmega2560 microcontroller is the heart of the Arduino Mega ADK. The datasheet provides detailed information about the microcontroller's features, including its memory, I/O, and peripherals.
  3. Arduino Mega ADK Pinout Diagram: A pinout diagram provides a visual representation of the board's I/O pins and their functions. You don't need to go anywhere. Just look up in the beginning of this page to see the interactive pinout diagram of Arduino Mega ADK ;)

Missing features in Arduino Mega ADK Rev3  

Having a large number of I/O pins together with the USB host feature and being able to communicate with Android devices, makes it a very unique choice for makers. But there are still some features that would be nice to have in a board like this:

  • More memory: Due to the large number of I/O pins, people tend to use the Arduino Mega ADK for bigger projects which typically means bigger program for controling. Having only 256K Flash seems to be insufficient for large projects.
  • Connectivity: Most modern development boards nowadays have a built-in Bluetooth or Wi-Fi capabilities, allowing for wireless communication and remote control.

It should be noted that the time this board was released at 2010, these features were very fancy and most of the board back then didn't have such connectivity or memory options. Also these features are not necessarily critical for every projects and the Arduino Mega ADK is still a powerful development board with a wide range of capabilities.


Similar Boards  

The following boards use the same ATmega2560 processor and have more or less similar pinout and functionality:

  • The Arduino Mega 2560 Rev3 - This board is an upgrade to the original Arduino Mega and features the same ATmega2560 microcontroller as the Arduino Mega ADK. It also has the same number of digital and analog pins, making it a great option for projects that require a lot of inputs and outputs. They're also both having the exact same form factor.
  • Seeeduino Mega: This board is a shrunk version of the Arduino Mega 2560 Rev3 and is manufactured by Seeed Studio. It has the same ATmega2560 processor and pinout as the Mega ADK.
  • RAMPS 1.4: This board is designed for use with 3D printers and is based on the Arduino Mega 2560 Rev3. It has the same ATmega2560 processor and pinout, but also includes additional components for controlling stepper motors and other components found in 3D printers.

These are just a few examples of boards with similar processors to the Arduino Mega ADK. There are many other options available, so it is important to research and compare the features and specifications of different boards before making a decision.


Arduino Mega ADK Rev3 Projects  

Here are a couple of projects to showcase the versatility and capability of the Arduino Mega ADK development board. Hopefully these provide inspiration for those looking to build their own projects using the board.


Platform

ManufacturerArduino
ProcessorATmega2560
Processor FamilyAVR
Clock Speed16 Mhz
Flash Memory256 KB
SRAM8 KB
EEPROM4 KB
Programming

I/O

Digital I/O54
Analog Input16
PWM15
ADC Resolution1024
Interrupts6 Pins 20 & 21 are not available to use for interrupts while they are used for I2C communication

Power

Input Voltage7-12 V
I/O Voltage5 V
I/O Current40 mA

Communication Protocols

I2C1x
SPI1x
UART4x

Connectivity

USB Type B1x to program/communicate with PC
USB Type A1x to connect to any device that have a USB port

Peripherals

Watchdog Timer1

Dimensions

Width53.3 mm
Length101.52 mm
Weight36 g